Theme Installation
Getting Started
-
To install this theme you must have a working version of Magento already installed.
-
Before we begin, there's one important thing to mention. Magento 2, despite its long development cycle, is new software. Magento 2 is also new software under rapid, ongoing development by the Magento core team and other third party extension developers and providers. If you run into a problem installing the theme, first, don't panic.
Before Installation
-
Always test the upgrade on a copy of your Magento before you upgrade your live store. Never go live with the upgrade without testing.
-
Backup Magento files and the store database.
Important
It's very important to backup all of themes and extensions in Magento before installation, especially when you are working on a live server. We strongly recommend you to do not omit this step.
-
Disable the following options:
Merge CSS Files,Enable Javascript Bundling,Merge JavaScript FilesandMinify JavaScript FilesunderStores > Configuration > Developer. You can enable these options again after installation. -
Remove all possible custom modifications of Magento's Blank theme becuase Carta inherits files from Magento's Blank Theme, So any modification of blank theme may change the default behaviour of Carta Theme and break some functionality.
-
You should never edit Magento's core files and default themes. Custom modifications should always be made via custom themes and modules.
-
Before you install the theme, make sure your store is disabled during the installation process. Enable Magento maintenance mode. You can find more details in Magento documentation: Enable or disable maintenance mode
-
You will need to disable the maintenance mode after installation by removing
var/.maintenance.flagfile. -
Logout from Magento admin panel.
Uploading Theme Files
-
This instructions will guide you through installing Carta Theme into your Magento 2 store.
-
Carta package is distributed as zip archive, and install directly your project root's app folder. Unzip your
magespark-carta.zipand you will see the follwing folders:
 - app
 - pub/media
-
The Magento module files are located in
app/code, and the Magento theme files are located inapp/design. Folderpub/mediacontains additional sample images. -
Using your FTP client upload
magespark-carta.zipfile into Magento Root Directory (the root directory of Magento is the folder which contains files, such as index.php and the directories app, bin, lib, pub and more). -
Unzip
magespark-carta.zipfile. It contains two directories:app,pub. Magento already contains the same directories –do not remove those existing directories. Directories extracted frommagespark-carta.ziphave to be merged with existing directories of Magento. Approve, if your system asks you whether you want to merge directories.
Note
This will not overwrite any core files of Magento, this will only add the theme to Magento. So if you see a message that those directories already exist on the server, you can confirm that you want to merge directories.
-
In case you can't unzip files on your server:
- Alternatively, you can unzip
magespark-carta.ziparchive on your computer, and upload its content (two directories:app, pub) to your Magento's root directory. But note that files can get broken if you send them via FTP without zipping. So it ishighly recommended to upload zipped files.
- Alternatively, you can unzip
-
For all the theme files and folders which you uploaded to your server.
Note
File system ownership and permissions may differ depending on server. In case of any doubts, please contact your hosting provider. Refer to Magento documentation for more details: Overview of ownership and permissions. And also please refer this Integrator installation
Installation
-
This section discusses how to install the Carta theme using command line. Magento has one command-line interface that performs both installation and configuration tasks. We are assuming that you have initial setup of Magento 2.2.X.
-
Activate Carta Extensions
-
Next, we need to enable the modules. In Magento 2, this requires the use of the
bin/magentocommand line application.php bin/magento module:enable VendorName_ModuleName -
Run setup upgrade scripts: After enabling the modules, you need to tell Magento it should run its setup upgrade scripts. Just run the following standard Magento command:
php bin/magento setup:upgrade
-
-
Deploy static view files
-
Magento 2 introduces the concept of "static", or "generated/compiled" frontend files. Magento modules and themes store their CSS, Javascript, and other frontend related files in the module folders, and generating/compiling them will move these files to Magento's web accessible folder. Generating static content is simple – just run the following Magento command:
php bin/magento setup:static-content:deploy -f -
After the process finishes running, you can see the generated files in the following folder:
pub/static/frontend/Carta
-
Enabling Carta theme
- Carta is now installed on your Magento system.
Note
at this point, you need to disable maintenance mode in your Magento (if you enabled it earlier). To do this you need to remove file .maintenance.flag which you created inside Magento var folder. After that, you will be able to log in to the admin panel again.
-
The next, and final step, is to configure Magento to use the Carta theme.
-
If you're using
Magento 2.2.X, In Magento's backend, navigate toContent > Design > Configuration
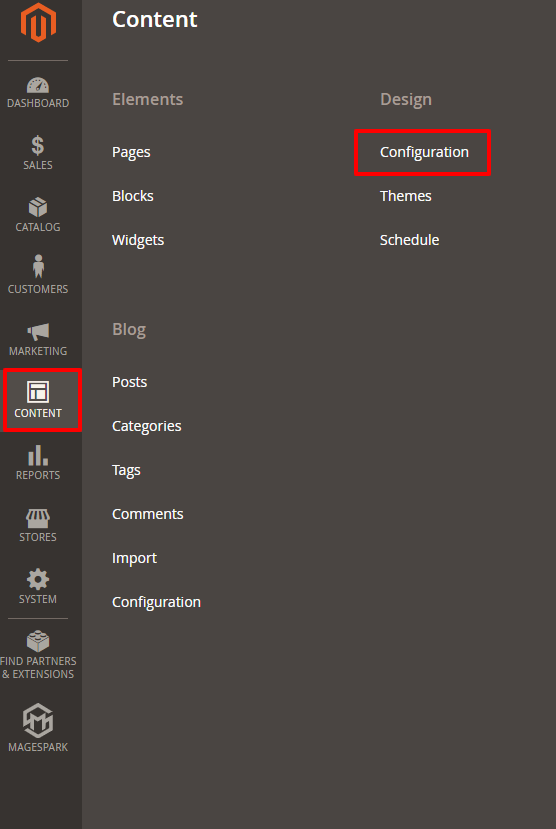
- In the configuration select corresponding store view, click Edit.

- On the Default Theme tab, in the Applied Theme drop-down, select Magespark Carta.

-
Click Save Configuration button.
-
If caching is enabled, navigate to
System > Cache Managementandflush Magento cache.
How to configure the logo height
- On the Admin panel, click
Content => Configuration > MageSpark Carta > Edit > Header section.
![]()
- Set width and height of the logo and save the configuration.